Employees
Manage your organization's user accounts — add individuals, bulk-import via CSV, configure SCIM provisioning, and control roles.
Introduction
The Employees feature in the Viven – Admin Portal is the central hub for managing your organization’s user accounts. Administrators can add individual employees, bulk-import users from a CSV file, manage roles and reporting lines, and provision accounts automatically via SCIM.
Keeping employee records accurate ensures that each user has the correct access, roles, and organizational context within the Viven platform.
What You Will Learn
By the end of this guide, you will be able to:
-
Navigate the Employees page and understand all available controls.
-
Add a new employee individually using the Add User form.
-
Bulk-import multiple users at once from a CSV file.
-
Customise which columns are displayed in the employee table.
-
Generate and manage a SCIM Bearer Token for automated provisioning.
-
Export and sync your employee list.
Changes made in the Employees section take effect immediately. Adding a user will trigger an email invitation to their registered email address.
Navigating the Employees Page
The Employees page is accessible from the left-hand navigation sidebar of the Admin Console. It displays a table of all users in your organization along with a toolbar of management actions.
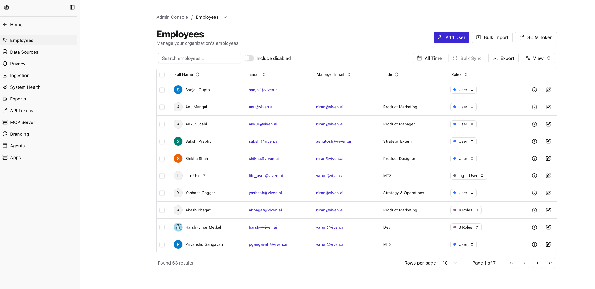
Figure 1 — The Employees management page
Toolbar Controls
The toolbar at the top of the page contains the following controls:
| Control | Description |
|---|---|
| Add User | Opens the Add New User form to create a single employee record. |
| Bulk Import | Opens the Bulk Import dialog to upload a CSV and create multiple users at once. |
| SCIM Token | Opens the SCIM Bearer Token dialog for automated user provisioning via SCIM API. |
| Search employees | Live search bar to filter the table by name or email. |
| Include disabled | Checkbox that, when checked, also shows deactivated or terminated employee accounts. |
| All Time | Date range filter for narrowing the employee list by hire date or activity period. |
| Bulk Sync | Triggers a sync of employee data with any connected identity providers. |
| Export | Downloads the current employee list as a CSV file. |
| View | Opens the column visibility panel to show or hide specific table columns. |
Employee Table Columns
Each row in the table represents one employee. The default columns are:
| Column | Description |
|---|---|
| Full Name | The employee’s display name. Click to open the employee’s profile. |
| The employee’s registered email address. | |
| Manager Email | Email of the employee’s direct manager, if configured. |
| Title | The employee’s job title. |
| Roles | The platform roles assigned to this user (e.g., User, Light User, Admin). |
| Actions | Edit (pencil) and Delete (trash) icons for managing individual records. |
Customising Table Columns
You can show or hide columns using the View panel. Click the View button in the toolbar to open a dropdown checklist of available columns.

Figure 2 — The View column visibility panel
The available columns are: Full Name, Email, Manager Email, Title, Hiring Date, Termination Date, Aliases, and Roles. Check or uncheck each column to toggle its visibility in the table.
For day-to-day use, keeping only Full Name, Email, Title, and Roles visible reduces clutter. Toggle Hiring Date and Termination Date when reviewing workforce changes.
Adding a Single User
Use the Add User button to create an individual employee record. Once added, the user will receive an email invitation to join the Viven platform.

Figure 3 — The Add New User form
Form Fields
★ denotes a required field.
| Field | Description |
|---|---|
| Full Name ★ | Required. The employee’s full display name. |
| Email ★ | Required. The employee’s work email address. An invitation will be sent here. |
| Job Title | Optional. The employee’s role or position. |
| Manager Email | Optional. Sets the reporting line in the org hierarchy. |
| Hiring Date | Optional. Date the employee joined the organization (dd/mm/yyyy). |
| Termination Date | Optional. Date the employee left the organization. Populating this disables the account. |
| Aliases | Optional. Alternate names or identifiers, separated by commas. |
Steps to Add a User
-
Click Add User in the top-right of the Employees page.
-
Enter the employee’s Full Name and Email (both required).
-
Optionally fill in Job Title, Manager Email, Hiring Date, Termination Date, and Aliases.
-
Click Add User to create the account. Click Cancel to discard.
-
The employee will receive an email invitation to set up their account.
If a Termination Date is set, the account will be treated as inactive. Leave this blank for active employees.
Bulk Importing Users
When onboarding multiple employees at once, use the Bulk Import feature to upload a CSV file containing all user records. This is significantly faster than adding users one at a time.
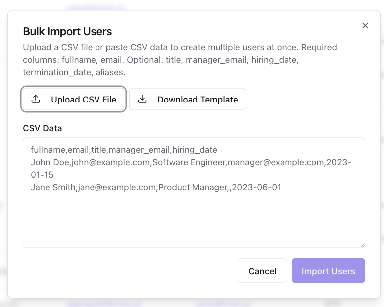
Figure 4 — The Bulk Import Users dialog
CSV Format
The CSV must include the required columns fullname and email. All other columns are optional. The first row must be the header row.
| Column | Required? | Description |
|---|---|---|
| fullname | Yes | Employee’s full display name. |
| Yes | Employee’s work email address. | |
| title | No | Job title or position. |
| manager_email | No | Email of the employee’s manager. |
| hiring_date | No | Hire date in YYYY-MM-DD format. |
| termination_date | No | Termination date in YYYY-MM-DD format. |
| aliases | No | Comma-separated alternate names or identifiers. |
Click Download Template in the Bulk Import dialog to get a pre-formatted CSV with all supported columns and example rows. This is the quickest way to get started.
Steps to Bulk Import Users
-
Click Bulk Import in the toolbar on the Employees page.
-
Choose your import method:
-
Upload CSV File — click the button and select your prepared CSV from your computer.
-
Paste CSV data — paste CSV-formatted text directly into the CSV Data text area.
-
Review the data in the text area to confirm it looks correct.
-
Click Import Users to process the import. Click Cancel to close without importing.
-
Newly created users will receive email invitations to join the platform.
If a row contains an email address that already exists in the system, that row will be skipped. Review any import errors reported after submission.
SCIM Provisioning
SCIM (System for Cross-domain Identity Management) allows your identity provider (IdP) — such as Okta, Azure AD, or OneLogin — to automatically provision and deprovision users in Viven. This eliminates the need for manual user management as your organization grows.
To enable SCIM provisioning, you need to generate a Bearer Token from the Viven – Admin Portal and configure it in your IdP.
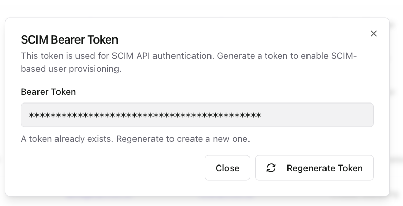
Figure 5 — The SCIM Bearer Token dialog
Generating a SCIM Token
-
Click SCIM Token in the toolbar on the Employees page.
-
The SCIM Bearer Token dialog will open. If no token exists yet, click Regenerate Token to generate one.
-
Copy the token displayed in the Bearer Token field.
-
Paste the token into your identity provider’s SCIM configuration as the Bearer Token or API key.
-
Click Close when done.
Regenerating a Token
If the existing token is compromised or you need to rotate credentials, click Regenerate Token. This will invalidate the old token immediately and issue a new one.
Regenerating the SCIM token will immediately break any active IdP connections using the old token. Update your identity provider with the new token straight away to restore automated provisioning.
Exporting and Syncing Employees
Exporting the Employee List
Click the Export button to download the current employee list as a CSV file. The export reflects the current filters applied to the table — for example, if you have searched for a specific name or filtered by date, only the matching rows will be exported.
-
Apply any filters or search terms you want the export to reflect.
-
Click Export in the toolbar.
-
A CSV file will be downloaded to your browser’s default download location.
Bulk Sync
The Bulk Sync button triggers a manual synchronisation of employee records with any connected identity providers or HR systems. Use this when you need to force an immediate update rather than waiting for the next scheduled sync.
-
Click Bulk Sync in the toolbar.
-
A sync job will be initiated in the background. Depending on the number of records, this may take a few minutes.
Bulk Sync only pulls updates from connected data sources. It does not push Viven records outward to external systems.
Frequently Asked Questions
Yes. When you add a user via the Add User form or Bulk Import, the system automatically sends an email invitation to the address provided. The user must accept the invitation to activate their account.
Add User is for creating a single employee record through a form interface. Bulk Import is designed for adding many users at once by uploading a CSV file, which is much faster when onboarding large teams.
Setting a Termination Date marks the account as inactive. The user will not be able to log in after that date. To view terminated accounts, check the Include disabled checkbox on the Employees page.
Yes. Click the edit (pencil) icon on the right side of any employee row to open an edit form with the same fields as the Add User form.
Click the delete (trash) icon on the employee's row. You will be asked to confirm the deletion. Alternatively, set a Termination Date to deactivate the account without permanently removing it.
When this checkbox is ticked, the table also shows deactivated or terminated employee accounts that are otherwise hidden. This is useful when reviewing historical records or reactivating a former employee.
Aliases are alternative names or identifiers for an employee, such as a nickname, former name, or short username. They help the platform recognise references to this employee across different data sources.
SCIM (System for Cross-domain Identity Management) is a protocol that lets your identity provider (e.g., Okta, Azure AD) automatically create, update, and deactivate user accounts in Viven. Use it when you want user lifecycle management to be handled automatically rather than manually.
The old token is immediately invalidated. Any identity provider currently using that token for automated provisioning will stop working until you update it with the new token. Always update your IdP configuration immediately after regenerating.
Bulk Sync forces a manual data synchronisation between Viven and any connected identity providers or HR systems, pulling in the latest user records. It is useful when you need changes to appear immediately rather than waiting for a scheduled sync.
Yes. Apply a search filter or date range before clicking Export. The downloaded CSV will only contain the rows currently visible in the table.