Privacy
Define automated privacy rules using Jinja template syntax and configure organization-level persona access controls.
Introduction
The Privacy feature in the Viven – Admin Portal gives administrators full control over how sensitive documents are detected, classified, and access-controlled across the organization. It is organized into three tabs: FAQs, Rules, and Settings.
Privacy Rules allow you to define automated logic — using Jinja template syntax — that detects sensitive documents based on their source, content, or metadata and marks them as private. Privacy Settings control persona-level access across the organization.
What You Will Learn
-
Navigate the three tabs of the Privacy page.
-
View, expand, edit, and delete existing privacy rules.
-
Create a new privacy rule using Jinja template conditions.
-
Configure organization-level persona access settings.
Privacy rules are enforced at query time (runtime) in the retrieval layer. This means changes to rules typically take effect immediately for new queries, without waiting for a document reprocessing cycle.
Privacy rules run automatically during document processing. Changes to rules may affect how existing documents are classified on the next processing cycle.
Navigating the Privacy Page
The Privacy page is accessible from the left-hand navigation sidebar of the Admin Console. It has three tabs, each covering a distinct area of privacy management:
| Tab | Purpose |
|---|---|
| FAQs | Manage a list of privacy-related FAQs surfaced to users within the platform. |
| Rules | Create and manage automation rules that detect and mark sensitive documents as private. |
| Settings | Configure organization-level persona access controls for digital twins. |
Privacy Rules
The Rules tab displays all configured privacy rules for your organization. Each rule is evaluated automatically during document processing to determine whether a document should be marked as private.
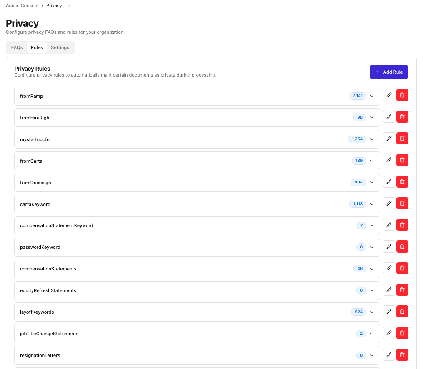
Figure 1 — The Privacy Rules tab showing all configured rules
Understanding the Rules List
Each row in the rules list represents one privacy rule. The following information is shown per rule:
| Element | Description |
|---|---|
| Rule Name | The unique Rule ID as set at creation time (camelCase format). |
| Document Count | Badge showing how many documents have matched this rule during processing. |
| Expand (chevron) | Click to expand the rule row and view its Precondition, Condition, and other configuration details. |
| Edit (pencil icon) | Opens the rule editor to modify the rule’s configuration. |
| Delete (red trash icon) | Permanently deletes the rule after confirmation. |
Editing a Rule
-
Click the pencil icon on the right side of the rule you want to edit.
-
The rule editor will open with the existing configuration pre-filled.
-
Make your changes to any editable fields. Note: the Rule ID cannot be changed after creation.
-
Save your changes.
Deleting a Rule
-
Click the red trash icon on the rule row you want to remove.
-
Confirm the deletion when prompted.
Deleting a rule is permanent and cannot be undone. Documents previously marked private by this rule may need to be re-evaluated. Only delete rules you are certain are no longer needed.
Adding a New Privacy Rule
Click the + Add Rule button on the Rules tab to open the Add New Privacy Rule form. Privacy rules use Jinja template syntax to evaluate document metadata and content.

Figure 2 — The Add New Privacy Rule form
Form Fields
★ denotes a required field.
| Field | Description |
|---|---|
| Rule ID ★ | A unique camelCase identifier (e.g., emailSensitiveContent). Cannot be changed after creation. |
| Rule Label | A human-readable name for the rule (e.g., "Email Sensitive Content Detection"). |
| Precondition ★ | A Jinja template that determines when the rule is evaluated (e.g., {{ document.source_type == 'email' }}). |
| Condition ★ | A Jinja template that checks for sensitive content (e.g., {{ re_exists(['sensitive'], document.data_json.body) }}). |
| Block documents when condition is | Toggle set to TRUE or FALSE. When TRUE, documents matching the condition are blocked/marked private. When FALSE, they are not. |
| Success Message | Message logged when the rule marks a document as private (e.g., "Document marked as private"). |
| Failure Message | Message logged when the condition is not met (e.g., "Rule condition not met"). |
| Filter Criteria | Optional. Add additional metadata filters to further narrow which documents this rule applies to. |
Jinja Template Syntax
Privacy rules are powered by Jinja template syntax. The following variables and functions are available when writing Precondition and Condition expressions:
| Variable / Function | Description |
|---|---|
| document.source_type | The source of the document (e.g., 'email', 'slack', 'gdrive'). |
| document.data_json | The document's parsed JSON data. Access nested fields with dot notation (e.g., document.data_json.body). |
| re_exists(patterns, text) | Returns true if any pattern in the list is found in the given text using regex matching. |
| list_utils.re_exists_in_list_of_list() | Utility for matching patterns against a list of lists of strings. |
Example Rules
Below are two examples of common privacy rule patterns:
Example 1 — Block emails containing the word "sensitive"
Rule ID:       emailSensitiveContent
Precondition:  {{ document.source_type == 'email' }}
Condition:     {{ re_exists(['sensitive'], document.data_json.body) }}
Block when:    TRUE
Example 2 — Block documents from a specific source (e.g., Ramp)
Rule ID:       fromRamp
Precondition:  {{ document.source_type == 'ramp' }}
Condition:     {{ True }}
Block when:    TRUE
Steps to Create a Rule
-
Click + Add Rule on the Rules tab.
-
Enter a unique Rule ID in camelCase. This cannot be changed later.
-
Optionally enter a human-readable Rule Label.
-
Write a Jinja expression in the Precondition field to define when the rule should be evaluated.
-
Write a Jinja expression in the Condition field to define what makes a document private.
-
Set Block documents when condition is to TRUE (to mark matching documents private) or FALSE (to exclude them).
-
Optionally fill in Success Message and Failure Message for audit logging.
-
Optionally click + Add Filter under Filter Criteria to add metadata-based filters.
-
Click Create Rule to save the rule.
The Rule ID must be unique and in camelCase format (e.g., passwordKeyword). It cannot be modified after the rule is created — plan your naming convention carefully.
Privacy Settings
The Settings tab contains organization-level toggles that control how digital twin personas are accessed across your organization. These settings apply globally to all users.
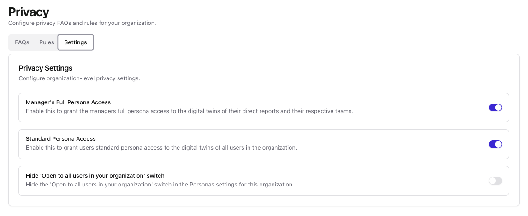
Figure 3 — The Privacy Settings tab
Available Settings
| Setting | Default | Description |
|---|---|---|
| Manager’s Full Persona Access | On | When enabled, managers have full access to the digital twins of their direct reports and their teams. Disable to restrict manager visibility. |
| Standard Persona Access | On | When enabled, all users can access the digital twins of other users in the organization at a standard access level. Disable to restrict cross-user visibility. |
| Hide ‘Open to all users in your organization’ switch | Off | When enabled, hides the 'Open to all users in your organization' toggle from the Personas settings UI, preventing users from changing that setting themselves. |
Changing a Setting
-
Navigate to the Privacy page and click the Settings tab.
-
Locate the setting you want to change.
-
Click the toggle on the right side of the setting to enable (blue) or disable (gray) it.
-
Changes take effect immediately — no additional Save button is required.
Disabling Standard Persona Access will prevent all users from viewing each other’s digital twins. Disabling Manager’s Full Persona Access will limit manager visibility of their team. Both changes take effect immediately for all active sessions.
Frequently Asked Questions
A privacy rule automatically evaluates documents during processing. If a document matches the rule's Precondition and Condition, it is flagged as private and blocked from general access. This prevents sensitive documents from being surfaced in searches or shared with unauthorized users.
The Precondition determines whether the rule should even be evaluated for a given document — for example, only apply this rule to email documents. The Condition is the actual sensitivity check that decides if the document should be marked private. Both must evaluate to true for the document to be blocked (when Block is set to TRUE).
You can use document.source_type to check the document's origin, document.data_json to access the document's parsed content (e.g., document.data_json.body for the body text), and helper functions like re_exists() for pattern matching.
No. The Rule ID is set at creation and cannot be modified. If you need to rename a rule, you must delete the existing one and create a new rule with the correct ID. Plan your naming convention carefully before creating rules.
The number shown next to each rule name is the count of documents that have matched that rule during processing. A count of 0 means the rule has not yet matched any document, which may indicate the rule logic or the Precondition needs review.
New rules apply to documents processed after the rule is created. Existing documents are not automatically reprocessed. Deleting a rule does not automatically reclassify documents that were previously marked private by it.
When set to TRUE, documents that match the Condition are marked as private (blocked). When set to FALSE, documents that match are explicitly not blocked — this can be used for allow-list logic. In most privacy use cases, you will set this to TRUE.
When enabled, managers can see the full digital twin personas of all their direct reports and their teams. This allows managers to query their team members' AI-generated insights. Disabling it restricts managers to only their own persona.
When enabled, every user in the organization can access the digital twin personas of their colleagues at a standard access level. Disabling this makes personas private by default, limiting cross-user persona visibility.
When this setting is enabled, the toggle that allows individual users to make their own persona open to everyone in the organization is hidden from their Personas settings page. This gives admins centralized control over persona visibility and prevents users from overriding the organization's policy.