Single Sign-On (SSO)
Single Sign-On (SSO) lets users access Digital Twin with their corporate Identity Provider (IdP), so they do not need a separate Digital Twin password. Digital Twin uses SAML 2.0.
Benefits
- Seamless experience - Users can sign in with existing corporate credentials
- Security - Authentication stays with your IdP
- Reduced support - Fewer password reset requests
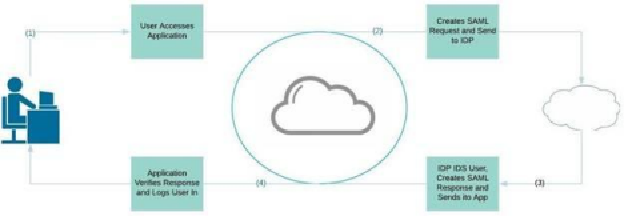
How It Works
- A user navigates to the Digital Twin application
- Digital Twin redirects them to your Identity Provider (IdP)
- The user authenticates via their existing corporate session (or logs in)
- The IdP returns a signed SAML response (including NameID and mapped user attributes)
- Digital Twin validates the IdP response and creates the user session
Service Provider (SP) Values
Use your customer domain with the digitaltwin subdomain.
Example customer domain:
- Customer domain:
acme.com - Digital Twin URL:
https://digitaltwin.acme.com
Share these values with your IdP administrator:
| Field | Value |
|---|---|
| SP Entity ID | https://digitaltwin.<customer-domain> |
| Assertion Consumer Service (ACS) URL | https://digitaltwin.<customer-domain>/sso_auth?acs=<customer-domain> |
| Single Logout (SLO) URL | https://digitaltwin.<customer-domain>/logout |
| ACS Binding | urn:oasis:names:tc:SAML:2.0:bindings:HTTP-POST |
| SLO Binding | urn:oasis:names:tc:SAML:2.0:bindings:HTTP-Redirect |
| NameID Format | urn:oasis:names:tc:SAML:1.1:nameid-format:emailAddress |
Replace <customer-domain> with your organization root domain (for example, acme.com). In most deployments, this is also your SSO partition identifier used in the ACS query param.
If you see invalid audience or invalid response errors, verify the SP Entity ID and ACS URL are an exact match in your IdP app (including trailing slash differences).
Admin Console Setup (XML Metadata + SP Settings)
Digital Twin supports admin-led setup in the Admin Console.
- Go to Admin Console -> SSO Setup
- In IdP Metadata XML, paste the XML metadata from your IdP
- Confirm/update the SP fields (the page pre-fills defaults from your current Digital Twin host):
- SP Entity ID
- ACS URL
- SP Single Logout URL
- ACS/SLO bindings
- NameID format
- Configure Allow Password Logins only for approved break-glass users/domains
- Click Save SSO Configuration
Required IdP Mappings
Configure your IdP app with:
- NameID = user email address
- Attributes for first and last name
- Access assignment for the user group(s) that should access Digital Twin
Validation Checklist
After saving SSO config:
- Open a private/incognito browser window
- Navigate to your Digital Twin URL (
https://digitaltwin.<customer-domain>) - Confirm redirect to your IdP
- Sign in with a test user
- Confirm successful login into Digital Twin
If login fails, re-check:
- SP Entity ID exact match
- ACS URL exact match
- NameID format and email mapping
- Valid (non-expired) IdP metadata certificate
What to Send Your Implementation Contact
Provide the following:
- Your IdP metadata XML
- Confirmation of the Digital Twin customer domain (for example,
digitaltwin.acme.com) - Your SSO test user email(s)
Supported Identity Providers
Digital Twin supports any SAML 2.0-compliant IdP, including:
- Okta
- Microsoft Entra ID / ADFS
- Google Workspace
- Micro Focus NetIQ
- OneLogin